Let’s get 2014 started on the right track by keeping in touch with friends and family throughout the year using this nifty Plivo and Mailgun API project. Connect your Plivo phone number to your email via your Mailgun account and receive email notifications every time you get an SMS message. You can even reply to messages straight from your email inbox.
You can build this gateway for free using:
- A free Plivo trial account. Once you’ve registered you can claim a free local US phone number by clicking Buy Number from the Phone Numbers page of the Plivo console.
- A free Heroku account. If you’re new to Heroku, visit the Getting Started page for guides on setting up your account. Create a new app and install the free RedisToGo add-on, which provides functionality for Redis, a key-value NoSQL database. In our example, we call our app your-heroku-app.
Push the application code to Heroku
Once you’ve created accounts on all three platforms, download the sample code for our plivomessenger application using Git. if you’re not familiar with Git, you can learn about it from Pro Git, a free online ebook.
Then git push the application to Heroku.
Configure your credentials in Heroku
This SMS-to-email gateway requires your Plivo authentication credentials and phone number, which you can find on the overview page of the Plivo console. Check out Heroku’s variable configuration tutorial if you need help.
Use any of your Plivo phone numbers from the Phone Numbers page of the Plivo console.
You also need to supply your Mailgun credentials, which you can get from the Mailgun Control Panel.
Configure Plivo
With Heroku properly configured, it’s time to let Plivo know where to find your SMS-to-email gateway application.
Visit the Voice > Applications page of the Plivo console and click Add New Application. Give a name to your application — we called ours “SMS Forward.” Set the Primary Answer URL and Message URL to
https://your-heroku-app.herokuapp.com/forward/?Emails=youremail@yourdomain.com. Then click Create Application.
Now assign your Plivo phone number to the application. Go to the Phone Numbers page and select the phone number you want to use. On the next screen, from the Application Type drop-down, select XML Application. From the Plivo Application drop-down, select the name of your application. Click Update Number to save your changes.
It’s not required, but it’s good practice to run the application locally to make sure everything is working properly. To do that, paste this link in your browser. Be sure to insert your own Heroku application URL and your email address:
https://your-heroku-app.herokuapp.com/forward/?Emails=youremail@yourdomain.com&From=1000&To=1000&Text=Test
The browser should display an empty <Response> XML document.
Configure your Plivo credentials in Mailgun
Now, time to do a little configuration for Mailgun. First, configure your DNS with a subdomain for incoming email. For this example, we set up my.plivo.com as our email domain by adding DNS records on Amazon Route 53. Most domain registrars offer similar zone editing software.

Let Mailgun know where to send your email
Next, in your Mailgun account, set up a mail domain for my.yourdomain.com:

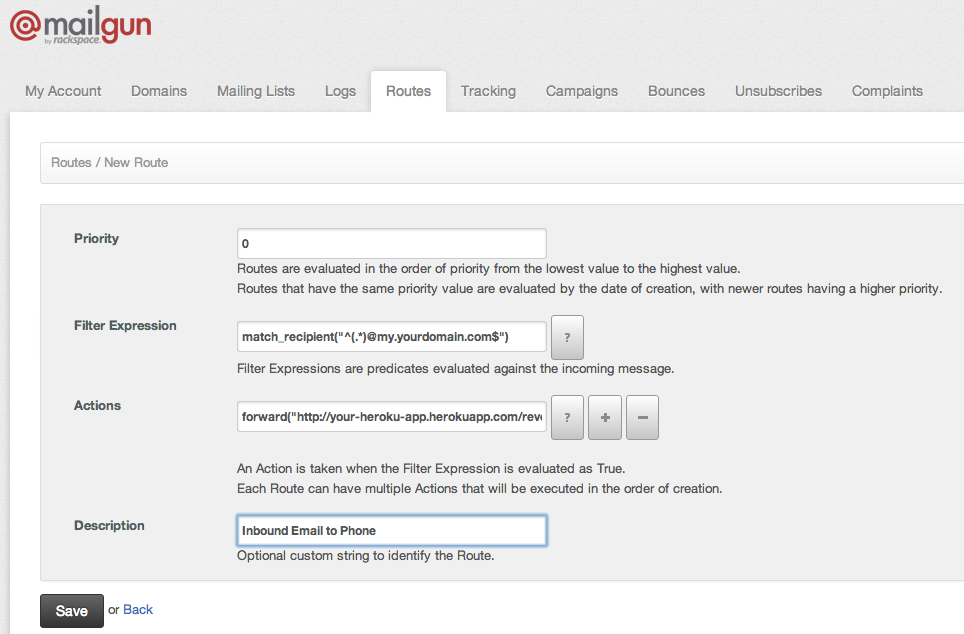
Then add your route to Mailgun. Click on the Route tab in Mailgun and add a new route with the following parameters:
Filter Expression: match_recipient(“^(.*)@ my.yourdomain.com$”)
Actions: forward("http://your-heroku-app.herokuapp.com/reverse/?")

That’s it! You can now try out your SMS-to-email gateway.
Test SMS to email
Try sending a text message to your SMS-enabled Plivo number. It should arrive in the inbox at youremail@yourdomain.com, as configured. The email will have originated from yourphonenumber@my.yourdomain.com.
Test email to SMS
Now try replying to that email. The reply should go back to your phone. In our application, we only let email forward to numbers from which we received a request.


