How It Works
Let’s look at an example to see how Plivo XML works. Consider a use case where you want to reply to an incoming SMS message. This diagram outlines the message flow for a typical case where XML is used: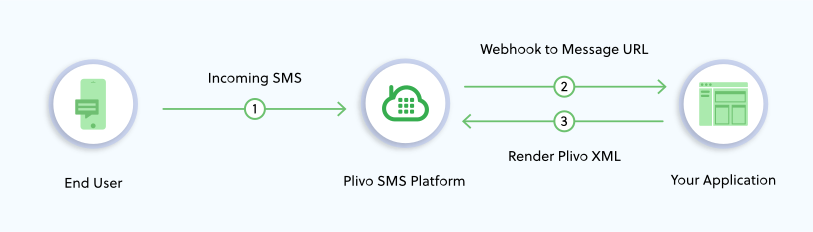
message_url configured for the Application that’s linked to the Plivo number and makes a request to that URL. Your web application at that URL should return an XML document that provides instructions to the Plivo API on how the SMS message should be handled. In this case, it should return a message XML document to reply to the incoming SMS message.
In this example, Plivo works like an HTTP client that receives a message and and makes a request to your web application for instructions on how to handle the message. By default, XML requests to your application are made via POST, but you can configure Plivo to make XML requests to your application via HTTP GET or POST methods by changing the related configuration parameter.
You can set configuration parameters when sending out a message. To deal with incoming messages, Plivo uses the configuration attached to the application that’s linked to the phone number on which your incoming message is received.
XML Request
When Plivo makes a synchronous HTTP request to your application, the API expects an XML document in response. Plivo also sends a few parameters with the HTTP request that your application can act upon before responding.Incoming Message Parameters
To receive a message, your Plivo Application must have amessage_url. Plivo expects an XML response from this URL after it sends the parameters below. Only a Message XML element can be sent as a response from the message URL.
Signature Validation
All requests made by Plivo to your server URLs consist ofX-Plivo-Signature-V2 and X-Plivo-Signature-V2-Nonce HTTP headers. To validate a request and to verify that the request to your server originated from Plivo, you must generate a signature at your end and compare it with X-Plivo-Signature-V2 parameter in the HTTP header to check whether they match. Read more about signature validation.
Methods to compute and verify X-Plivo-Signature-V2 are available in the latest server SDKs. Choose the SDK for the programming language of your choice to see how to use these methods.
Signature Validation Arguments
Note: You can either use
X-Plivo-Signature-V2 or X-Plivo-Signature-Ma-V2 to validate the signature.X-Plivo-Signature-V2is generated using the Auth Token of the associated account or subaccount. To validate using theX-Plivo-Signature-V2request header, generate the signature at your end using the same account or subaccount.X-Plivo-Signature-Ma-V2is always generated using the Auth Token of the account. To validate using theX-Plivo-Signature-Ma-V2request header, generate the signature using the main account.
XML Response
When your application gets initiated to send a message, Plivo makes an HTTP request to themessage_url, which is one of the mandatory parameters when sending a message.
Requirements
- The
message_urlshould respond with an XML document that provides instructions to control the SMS. - The
Content Typeof the response header, returned by themessage_url, must be set totext/xmlorapplication/xml. - The XML document returned should contain a valid Plivo Message XML element as described below.
Structuring the XML Document
The Parent Element
The<Response> element is the parent element of Plivo’s XML. All child elements must be nested within this element. Any other structure is considered invalid.
Child Elements
Child elements are proprietary Plivo elements and are case-sensitive. This means that using<message> instead of <Message>, for example, will result in an error. Attributes for the child elements are also case-sensitive and “camelCased.”
When Plivo receives an XML response, it executes the elements from top to bottom.
Example XML Response
Message Element
Use the Message element to send a message during your call flow. For instance, if you want to send out an SMS notification when you receive an incoming call on your Plivo number, you can use the<Message> element in your application.
To receive a message, you must set a message URL in your Plivo application via the API or in the Plivo console at Messaging > Applications.