SMS Bulk Messaging Using Node.js
Overview
This guides shows how to send an SMS text message to multiple phone numbers. You can use this technique to tell customers about new offerings or send out customer surveys, among other use cases.
You can send bulk SMS messages either by using our PHLO visual workflow builder or our APIs. Follow the instructions in one of the tabs below.
You can create and deploy a PHLO to send bulk SMS text messages with a few clicks on the PHLO canvas and trigger it with a few lines of code.
How it works
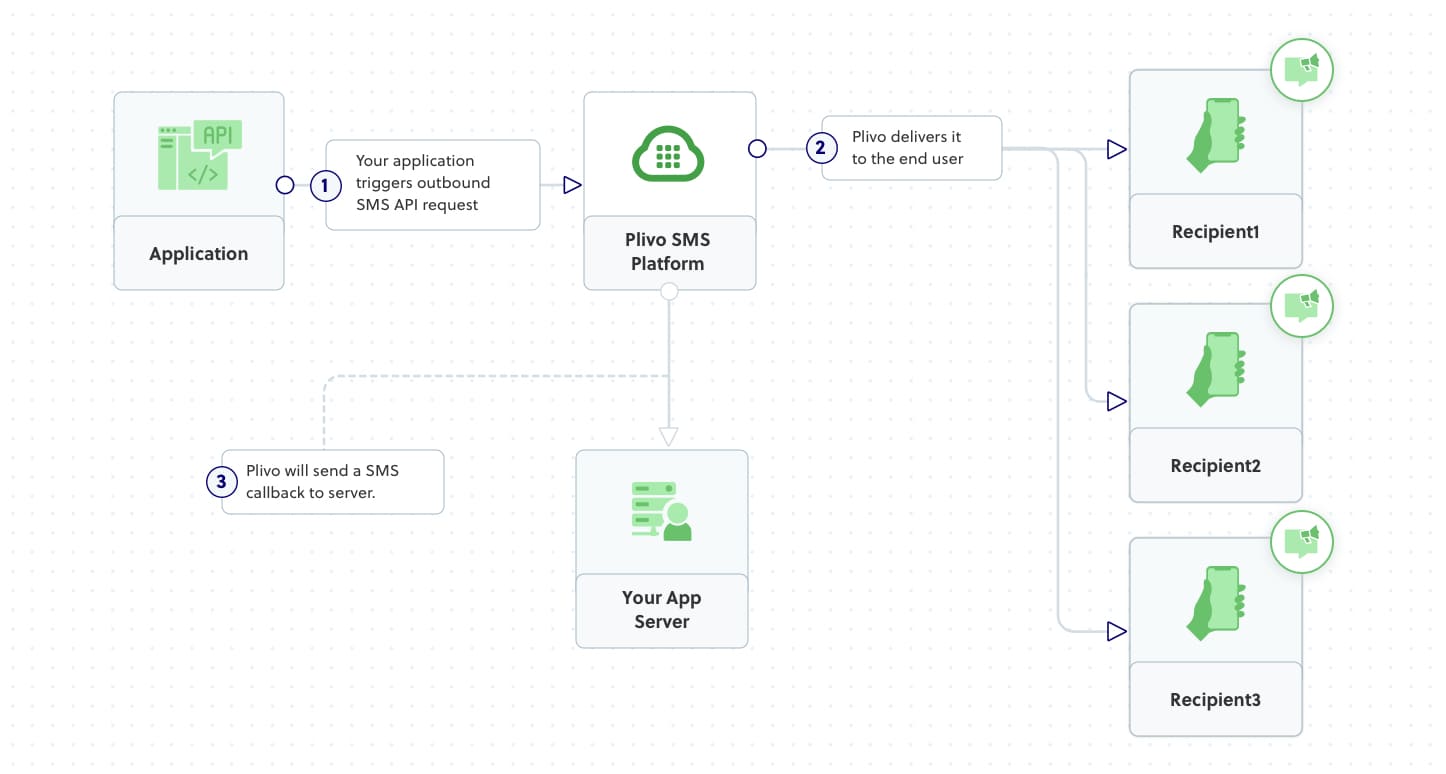
Prerequisites
To get started, you need a Plivo account — sign up with your work email address if you don’t have one already. If this is your first time triggering a PHLO with Node.js, follow our instructions to set up a Node.js development environment.
Create the PHLO
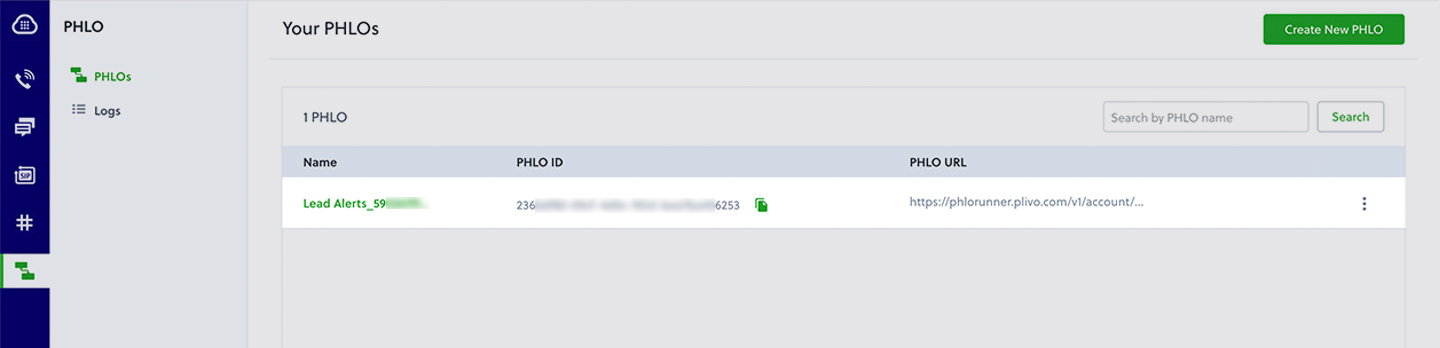
To create a PHLO, visit the PHLO page of the Plivo console. If this is your first PHLO, the PHLO page will be empty.
-
Click Create New PHLO.
-
In the Choose your use case pop-up, click Build my own. The PHLO canvas will appear with the Start node.
Note: The Start node is the starting point of any PHLO. It lets you trigger a PHLO to start upon one of three actions: incoming SMS message, incoming call, or API request. -
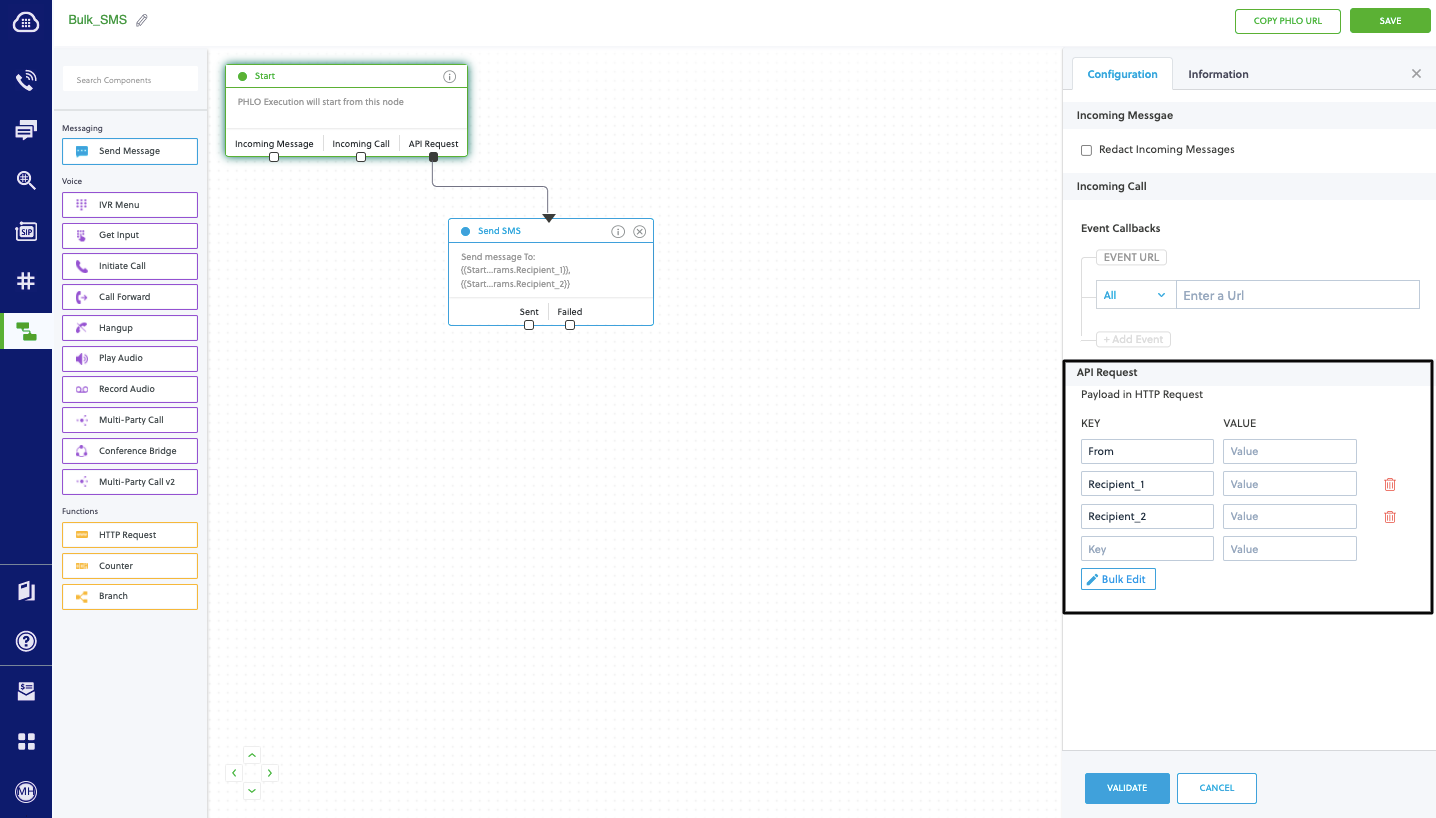
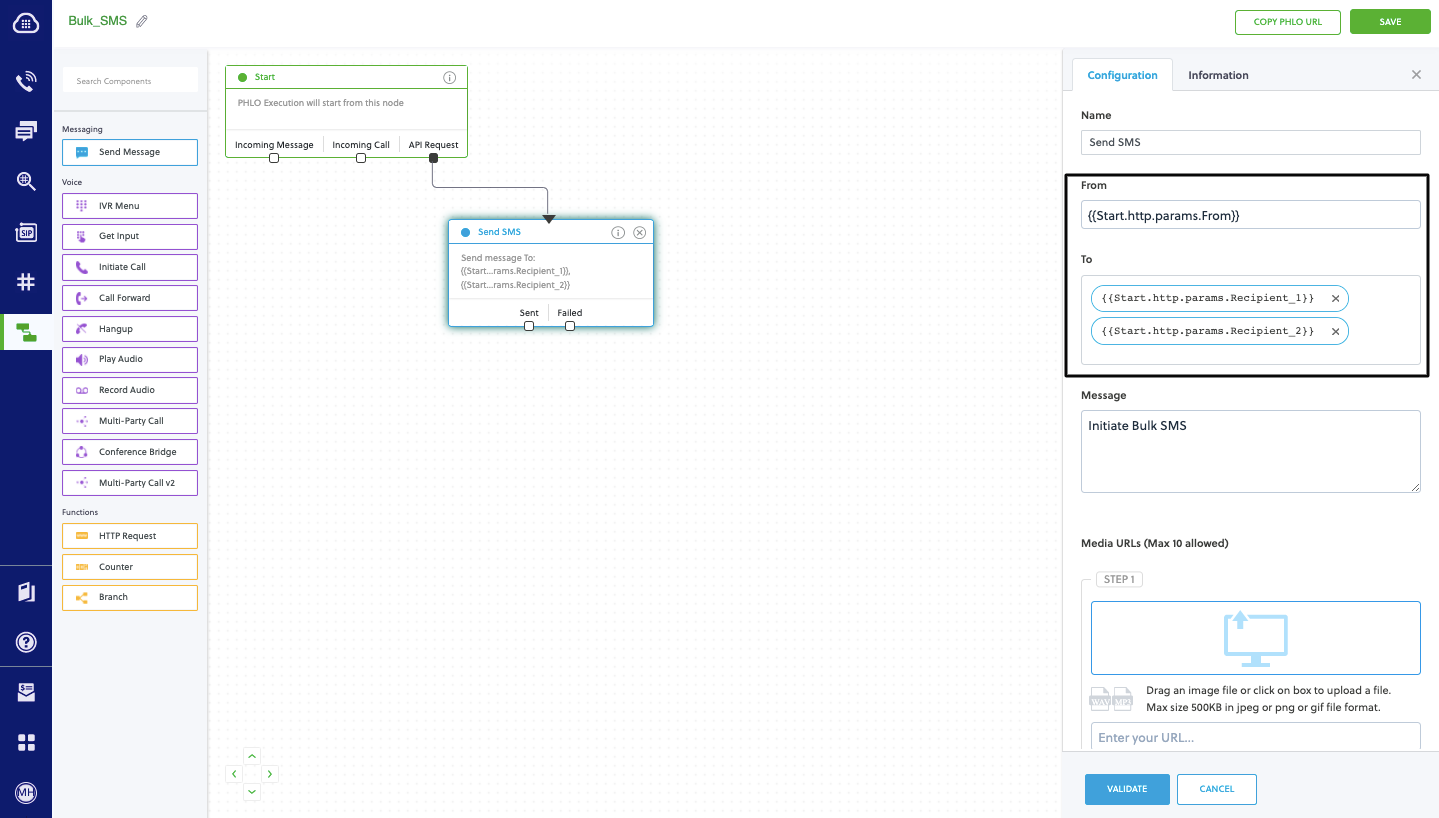
If you plan to use a dynamic payload — passing values through parameters when you trigger the PHLO from your application — click on the Start node to open the Configuration pane. Under API Request, enter key names for the variables you want use in your payload — From, To, and Message fields.
-
Once you’ve configured the node, click Validate to save the configuration.
-
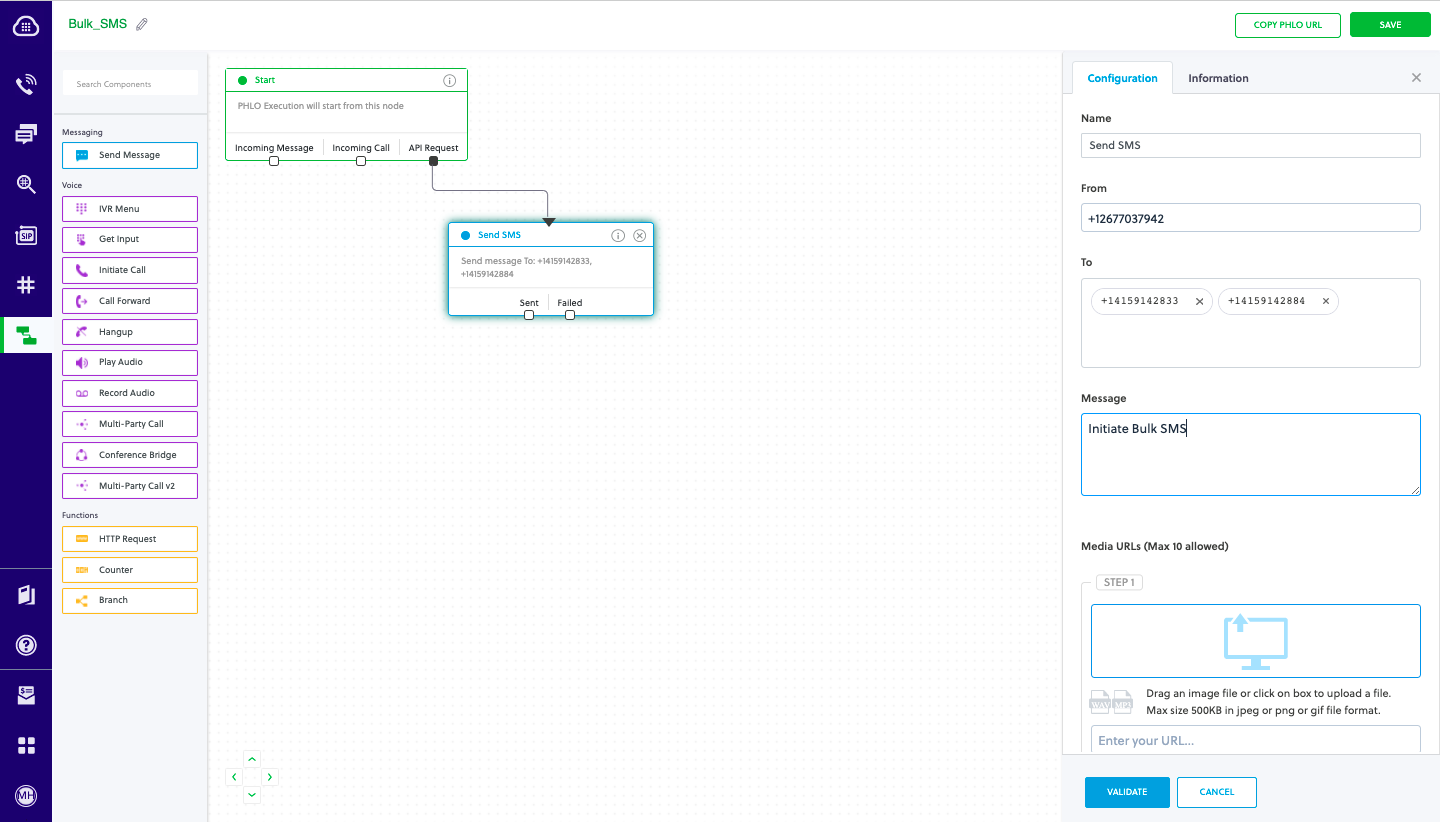
From the list of components on the left-hand side, drag and drop the Send Message component onto the canvas. When a component is placed on the canvas it becomes a node.
-
Draw a line to connect the Start node’s API Request trigger state to the Send Message node.
-
In the Configuration pane at the right of the canvas, configure the Send Message node with a sender ID in the From field. Enter the destination number you wish to send a message to in the To field. Put your message in the Text field.
Note: You can define a static payload by specifying values when you create the PHLO, or define a dynamic payload by passing values through Liquid templating parameters when you trigger the PHLO from your application. -
Once you’ve configured the node, click Validate to save the configuration.
-
After you complete the configuration, give the PHLO a name by clicking in the upper left, then click Save.
Your PHLO is now ready to test.
Trigger the PHLO
You integrate a PHLO into your application workflow by making an API request to trigger the PHLO with the required payload — the set of parameters you pass to the PHLO. You can define a static payload by specifying values when you create the PHLO, or define a dynamic payload by passing values through parameters when you trigger the PHLO from your application.
In either case, you need your Auth ID and Auth Token, which you can get from the overview page of the Plivo console.

You also need the PHLO ID, which you can copy from the PHLO list page.
With a static payload
When you configure values when creating the PHLO, they act as a static payload.
Code
Create a file called TriggerPhlo.js and paste into it this code.
1
2
3
4
5
6
7
8
9
10
11
12
13
14
var plivo = require('plivo');
var PhloClient = plivo.PhloClient;

var authId = '<auth_id>';
var authToken = '<auth_token>';
var phloId = '<phlo_id>';
var phloClient = phlo = null;

phloClient = new PhloClient(authId, authToken);
phloClient.phlo(phloId).run().then(function (result) {
    console.log('Phlo run result', result);
}).catch(function (err) {
    console.error('Phlo run failed', err);
});
Was this code helpful
Replace the auth placeholders with your authentication credentials from the Plivo console. Replace the phlo_id placeholder with your PHLO ID from the Plivo console.
With a dynamic payload
To use dynamic values for the parameters, use Liquid templating parameters when you create the PHLO …
… and pass the values from your code when you trigger it.
Code
Create a file called TriggerPhlo.js and paste into it this code.
1
2
3
4
5
6
7
8
9
10
11
12
13
14
15
16
var plivo = require('plivo');
var PhloClient = plivo.PhloClient;


var phloId = '<phlo_id>';
var phloClient = phlo = null;

var payload = {
    'From': '<sender_id>',
    'Recipient_1': '<destination_number_1>',
    'Recipient_2': '<destination_number_2>',
}
phloClient = new PhloClient('<auth_id>', '<auth_token>');
phloClient.phlo(phloId).run(payload).then(function(result) {
    console.log('Phlo run result', result);
});
Was this code helpful
Replace the auth placeholders with your authentication credentials from the Plivo console. Replace the phlo_id placeholder with your PHLO ID from the Plivo console. Replace the phone number placeholders with actual phone numbers in E.164 format (for example, +12025551234).
Test
Save the file and run it.
node TriggerPhlo.js
Here’s how to use Plivo APIs to send bulk marketing SMS text messages.
How it works
Prerequisites
To get started, you need a Plivo account — sign up with your work email address if you don’t have one already. If this is your first time using Plivo APIs, follow our instructions to set up a Node.js development environment.
Create the send SMS application
Create a file called send_sms.js and paste into it this code.
1
2
3
4
5
6
7
8
9
10
11
12
13
14
var plivo = require('plivo');
(function main() {
    'use strict';
    var client = new plivo.Client("<auth_id>", "<auth_token>");
    client.messages.create(
      {
          src: "<sender_id>",
          dst: "<destination_number_1<destination_number_2>",
          text: "Flash sale — half price on all products — offer expires at midnight. Use code 50OFF at checkout"
      },
      ).then(function (response) {
        console.log(response);
    });
})();
Was this code helpful
Replace the auth placeholders with your authentication credentials from the Plivo console. Replace the phone number placeholders with actual phone numbers in E.164 format (for example, +12025551234). In countries other than the US and Canada you can use a sender ID for the message source. You must have a Plivo phone number to send messages to the US or Canada; you can buy a Plivo number from Phone Numbers > Buy Numbers on the Plivo console or via the Numbers API.
Test
Save the file and run it.
node send_sms.js